

Hey, hello, hi thanks for stopping by! Want to learn how to test React UseState with Jest or how to mock useState in jest? Well, look no further. This article covers basic component testing, as well as testing for state. We will create a stateful button component and then write a test for it using Jest and React Testing Library (RTL). We’ll be using a React Typescript project, but don’t worry if Typescript is new to you, this informative article will help fill in the gaps.
Estimated reading time: 7 minutes
Important! This article is for you if your component doesn’t change state with a user event such as a click. If you want to test state change when a user fires an event, test the event instead! See an example test of useState on a button that is disabled when clicked:
// A simple jest test that uses fireEvent to test state on click:
  it('tests that the button is disabled when state is true', () => {
    render(<App />)
    fireEvent.click(screen.getByRole('button'))
    expect(screen.getByRole('button')).toBeDisabled()
})Skip to important parts:
- Jump to the Code example of the Component in full
- Jump to mock useState in RTL
- Code example of Jest Test in full
If you’ve been to this site before, then you know I love a button. Let’s face it what component could be more simple to understand than a button? So, in my usual fashion, we’re going to create a Button Component.
The Button Component
Below is the full code of our Button component.
import React, { useState } from 'react'

interface IButton {
icon: string
}
const Button: React.FC<IButton> = ({icon}) => {
    const [disabled, setDisabled] = useState(false)

    return (
        <>
        <span>{icon}</span>
        <button disabled={disabled} onClick={() => setDisabled(true)}>Click to disable</button>
        </>
    )
}
export default Button
If you like building buttons, check out this how to create accessible toggle buttons with Material UI. If building stuff from scratch is more your thing, check out this tutorial on making accessible toggle buttons.
The Button Type Interface – Typescript
The following code is how we declare data types for the props in a React component for Typescript. It’s called an interface and it just simply helps us test, and work with our Button component to cut down on errors and confusion.
interface IButton {
icon: string
}
This interface is saying, hey the label prop and the icon prop are both strings. Now, whenever I use this Button component, if I’m using VSCode, my IDE will yell at me to remind me to add in the icon prop. It will also tell me that it must be a string.


As you can see in the above image, I’ve imported the Button component to use in my React App. It has a red squiggly line. When I mouse over the Button component watch the magic happen:

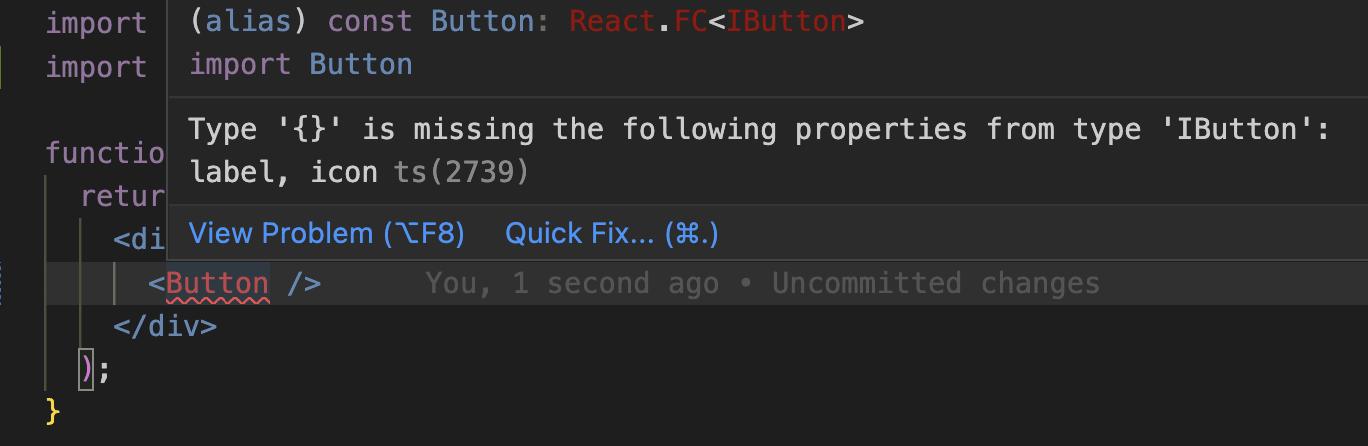
We see this modal appear that tells us exactly what information we’re missing.
Now I know I need to enter in the icon prop and it must be a string, I can use the quick fix option and update my button like this:
<Button icon="" />Want to learn more about Typescript? Check out this post about setting up a WordPress project to use Typescript with ESLint.
Basic component testing – Button Jest test
Let’s start by creating a test file. I used Create-react-app for this project, so I can just update the App.test.ts file. I’ll start by updating my import statements at the top of the file.
import { render, screen } from '@testing-library/react';
import Button from './Button';
When using Typescript with React and Jest, the great news is that when we render our Button component inside of our Jest test, we’ll get this same help from Typescript when testing our props.
Let’s take the code below in isolation to see what I mean:
    it('tests the button props', () => {
        render(<Button />)
    })
In VSCode, we get the same red squiggly line under the button component. In our render function in this test, we can add the icon prop and make it any string. In a jest test all we want is to know that our component will behave as expected. Therefore, we mock the prop values to be any string of our choosing.
 it('tests the button props', () => {
        render(<Button icon="icons" />)
    })
As you can see the value in and of itself doesn’t matter. What matters is that we have a prop and it is a string. Now we can use these mock values to test what we expect our component to behave like.
it('tests the button props', () => {
        render(<Button icon="icons" />)
        expect(screen.getByRole('button', {name: 'Click to disable'})).toBeInTheDocument()
    })
In the code above, I am grabbing an HTML element with an aria role of button. The button text should say “Click to disable” because that is the label I’ve given it and if you go back to the Button component you’ll see the label prop is implemented as the button text. This test will pass.
Set up our Jest Unit test For Stat
Let’s begin by updating our initial test so that it also checks for the button’s initial state. We are basically testing if the button will be disabled, so we can use the “not” and “toBeDisabled” functions from Jest.
test('renders the button', () => {
  render(<Button icon="icons" />);
  const buttonElement = screen.getByRole('button', {name: 'Click to disable'})
  expect(buttonElement).toBeInTheDocument();
  expect(buttonElement).not.toBeDisabled();
});
Import State Modules into the Jest useState Unit test
We’re learning how to mock useState in jest. Starting with our imports, add the import of React and useState as useStateMock from react into the test file.
import React, { useState as useStateMock } from 'react';Create a Test Suite
When testing a React component, we should create a test suite by first adding the describe() function and passing the name or our component as the first parameter. This will prove useful when we are examining our tests that have run as it organizes our test cases.
Below our imports we’ll add a describe block like so:
describe('Button', () => {
})
Next, inside of our describe block we’ll add an it() block. The it() block is where each individual test will be housed. I like using it() over ‘test()’ for readability. What we are testing should be the first parameter of the it block like this:
describe('Button', () => {
    it('tests the button initial state', () => {
       // add test code here
    })
})
When I run npm run test in my terminal and my jest test fails, I’ll now be able to see the component and the test that failed like so:


Go deeper into Jest and React Testing Library with this getAllByRole example.
Mock useState in React
To use jest to mock useState, we’ll need to actually use useState from React. The jest.requireActual() function allows us to return the actual React useState module instead of mocking it out.
At the top of our file under our import statements and before the describe() block, we’ll add this code:
jest.mock('react', () => ({
	...jest.requireActual('react'),
	useState: jest.fn()
}))
const setState = jest.fn()
Next, at the top of our test suite, we’ll add this beforeEach() block. This will run clean up and reset our state before each test runs.
describe('Button', () => {
    beforeEach(() => {
		useStateMock.mockImplementation((init: boolean) => [init, setState])
	})
As you can see, we’re using useStateMock as an alias which we pulled in at the top of our file when we imported useState. From useState we’re calling mockImplementation().
This function accepts a function that will be used as an implementation of the mock for one call to the mocked function. Okay but what does that mean exactly? We’re writing a function inside the mockImplementation() function (init: boolean) => [init, setState]). The first parameter of this function is init and we’ll return something that looks a lot like the way we define state in React. Notice how setState is a mock jest function.
What does that actually do? Well, in our tests, mockImplementationOnce is calling the use of useState in our Button component once for each time we use useState in the component.
Another way to say this is when we call mockImplementationOnce and pass the first parameter of the array a value, that value is the state of our component.
Testing the default state
In our original test, we’re testing the state of our button when the state is false, or in other words its default state:
We can actually write this test like this below and it will produce the same result because the use of this mockImplementationOnce() function is calling the default state of the component, which is false.
    it('tests the button initial state', () => {
        useStateMock.mockImplementationOnce((init: boolean) => [init, setState])
        render(<Button icon="icons" />)
        expect(screen.getByRole('button')).not.toBeDisabled()
    })
Note that in this test our assertion is testing that the button is not disabled.
Testing the state change
In the next test we’re going to change the first value in the return statement of the mockImplementationOnce() function to true. Then we’ll expect our button to be disabled since the disabled button attribute is tied to this piece of state.
    it('tests that the button is disabled when state is true', () => {
        useStateMock.mockImplementationOnce(() => [true, setState])
        render(<Button label="poopy" icon="icons" />)
        expect(screen.getByRole('button', {name: 'poopy'})).toBeDisabled()
    })
Want to set up React Testing Library in a Vite React project? Look no further, we’ve got you covered.
The Jest Test in full
import { render, screen } from '@testing-library/react';
import React, { useState as useStateMock } from 'react';
import Button from './Button';

jest.mock('react', () => ({
	...jest.requireActual('react'),
	useState: jest.fn()
}))
const setState = jest.fn()

describe('Button', () => {
  beforeEach(() => {
		useStateMock.mockImplementation((init: boolean) => [init, setState])
  })
	it('tests the button initial state', () => {
		render(<App />);
    useStateMock.mockImplementationOnce((init: boolean) => [init, setState])
		const buttonElement = screen.getByRole('button');
		expect(buttonElement).toBeInTheDocument();
		expect(buttonElement).not.toBeDisabled();
	});
  it('tests that the button is disabled when state is true', () => {
    useStateMock.mockImplementationOnce(() => [true, setState])
    render(<App />)
    expect(screen.getByRole('button')).toBeDisabled()
})
});
Conclusion
That’s it! Hopefully now you have a good understanding of how to test React useState with Jest. We ran through how to test props on a React component. We covered how to actually use React useState in a test with jest.mock and jest.requireActual. And finally you got to see how to use mockImplementationOnce() to dictate the state of your component within your test.